How to Troubleshoot Network Adapter Problems in Windows?
Network adapter issues are one of the most common causes of the breakdown of a wired network. It may bring about slow connections, intermittent connections, and even lost or no connection to your network. To have stable network connectivity, it’s important for you to know how to troubleshoot network adapter problems on your own.
Troubleshoot Network Adapter Problems Through Hardware
If the network adapter is not working, you can begin with the following hardware troubleshooting steps:
1. Check all the physical connections: Making sure all the network cables or optical cables and network cards are firmly and properly seated in ports or slots without loose or unplugged. You can try to unplug the cards and insert them again. If your NIC is still unable to connect with your network, you can move to step 2.
2. Check the LED indicators of your network cards: If the link LEDs fail to light, it means the physical connection is inaccessible to the network. There may be a problem with either the network devices or the network itself. Firstly, you can try to insert cables or adapters in different ports or slots to see whether the ports or slots are damaged. If the problem is still unsolved and you happened to have extra cables and NICs, you can change new cables or NIC cards to verify whether the cables and NICs are damaged. If you don’t have a new NIC or cable, you can just install the card in another computer or server. Unsolved either, then you need to confirm the compatibilities of cables and network devices connected with your adapter to see whether their brand, data rate, and port type are matched.
3. Check your network adapter status: You can use Device Manager to verify whether the network card is identified by your computer or server via the following steps. If not, you go to the next part directly: Troubleshoot Network Adapter Problems Through Software.
a. Press Win+R on your keyboard to quickly summon the RUN box.
b. Input “devmgmt.msc” in the box and click the OK button to open Device Manager.
c. Click Network Adapters in Device Manager to expand this section. After that, double-click your network adapter entry. Then, you can see the network card status on the General tab. If “This device is working properly” is shown on that page, it proves that the network card is still working; if not, there might be some specific problems with your card.

4. Check the operating system for resource conflicts: Verifying whether there are resource conflicts between the NIC and some other system component. A NIC should not share an IRQ with SCSI or RAID controllers if possible. These settings can be hard-set within most server BIOS programs.
a. Press F1 at bootup to enter the Setup/Configuration Utility.
b. Look under Advanced Setup/PCI Slot/Device Information (or PCI Bus Control) and select the slot or device to be changed.
c. Disable any unused devices to free up resources (serial ports, parallel ports, and so forth).
5. Check network settings within the operating system: Ensuring all protocols and network hardware are set correctly (cables, hubs, switches, etc.). All IP addresses should be unique and DHCP is set correctly to automatically obtain a TCP/IP address.
6. Verify TCP/IP (or other appropriate protocol) is properly installed: You can check this under Microsoft Windows:
a. Right-click the My Network Places icon and select Properties. The network card should be presented as Local Area Connection.
b. Right-click the appropriate Local Area Connection and select Properties. In the Properties window, make sure that the Internet Protocol (TCP/IP) is installed.
c. If TCP/IP is not installed, click Install, click Protocol, and then click TCP/IP.
d. Once installed make sure that Obtain an IP address automatically and Obtain DNS server address automatically are checked (if using DHCP). To verify this, highlight the TCP/IP protocol, and select Properties. (Note: Only use a Static IP Address if your network/Service Provider requires one.)
7. Verify the TCP/IP address: You can do this under Microsoft Windows:
a. Click Start, select Programs, select Accessories, and then click Command Prompt.
b. Type the command, ipconfig. This will list the IP address for the local machine.
c. If this returns a 169.x.x.x or 0.0.0.0 address, type the following commands, ipconfig/release and then ipconfig/renew. You should then receive a TCP/IP address appropriate to your network, along with a Default Gateway address.
d. Try to communicate with it by typing the command ping x.x.x.x (where x.x.x.x is the IP address of the Default Gateway).
e. If this does not give a reply or you did not receive a TCP/IP address, go to the next step.
8. Ping the loopback address: You can do this under Microsoft Windows:
a. Click Start, select Programs, select Accessories, and then click Command Prompt.
b. Type the command, ping 127.0.0.1. This will send a message to the internal network stack on the machine. You should see a response like this:
Pinging 127.0.0.1 with 32 bytes of data:
Reply from 127.0.0.1: bytes=32 time<10ms TTL=128
Reply from 127.0.0.1: bytes=32 time<10ms TTL=128
Reply from 127.0.0.1: bytes=32 time<10ms TTL=128
Reply from 127.0.0.1: bytes=32 time<10ms TTL=128
Ping statistics for 127.0.0.1:
Packets: Sent = 4, Received = 4, Lost = 0 (0% loss),
Approximate round trip times in milliseconds:
Minimum = 0ms, Maximum = 0ms, Average = 0ms
9. Ping your system's IP address: To further troubleshoot network adapter issues, you can connect the system directly to another system or a client via a crossover cable or dumb-hub. Setup TCP/IP using two consecutive addresses (e.g. 10.1.1.1 and 10.1.1.2) and use the default subnet masks (255.0.0.0). From a command prompt, try to Ping the client IP address. If the system gets a response, the network adapter is fine. If not, you can turn to the following software part.
Troubleshoot Network Adapter Problems Through Software
After ruling the hardware part out of network adapter issues, it’s time for us to troubleshoot the software part.
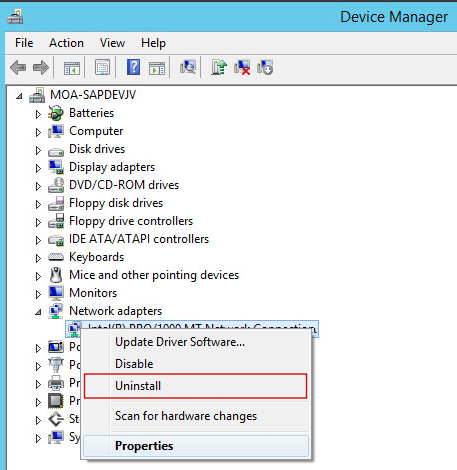
1. Reinstall network adapter drivers: Just like the way we use in the above part, enter the Device Manager box and expand the Network Adapters section in Device Manager. Then right-click the name of the Network Adapter and select Uninstall. After confirming Device Uninstall by clicking OK, the driver will be rebooted to reinstall.
2. Update the network drivers: From a computer that has Internet access, check the official software website for network drivers for your product or ask the customer service for help. If one is available, download and install the latest update for your network hardware.
3. Change or update your device system: Sometimes, the network adapter not working may be caused by the device system. You can try to reinstall your windows system or update to a new version (if there is a newer version than yours).
4. Problems still unsolved: If all the above steps still have not solved your problem, you can contact your network administrator for more help. Or you can refer to “Need More Assistance?” if you bought your network devices from FS.
Summary
The network card has almost been penetrated into every corner of our Internet life. Network adapter problems are commonly faced by most of us. It’s necessary for us to get some basic knowledge about how to solve them when we are in trouble.
You might be interested in
Email Address

-
PoE vs PoE+ vs PoE++ Switch: How to Choose?
May 30, 2024


