

How to Use and Buy Fiber Patch Panel for Better Cable Management
Fiber patch panels, also called fiber enclosure, are used as a cost-effective fiber optic cable management and maintenance method in today’s data centers. With a fiber patch panel, installers can quickly do the cabling just by making changes to cables on the patch panel itself. What’s more, the fiber patch panel also allows for easier cable management and identification of fiber cable routing. Nowadays, there are various fiber patch panels on the market. Faced with a dazzling array of options, how to choose the right patch panel and install it for your fiber network? This post introduces several points you should consider.
Types of Fiber Patch Panel
A fiber patch panel is an interface between several optical fibers and optical equipment. It is a fiber termination unit that aids in networking and fiber distribution from the wiring closet to various terminal equipment. Fiber patch panels are classified into two types based on their design: wall mount and rack mount. Fiber optic cables and connectors can be housed, organized, and protected in either type.
Wall mount fiber enclosure: A low-profile and compact wall mount fiber patch panel is typically installed on interior walls. It has a terrace where a flexible cabling system can be installed according to the number of ports (1/2/4 ports). This patch panel is ideal for installing pre-connected cables and connectors on-site.
Rack mount fiber enclosure: A rack mount fiber patch panel is an indoor network device designed for standard 19-inch rack mounting. Because of the various connection requirements, it is available in 1U, 2U, and 4U sizes. This type can accommodate all types of fiber adapter ports, including SC, LC, ST, and FC.

How to Use the Fiber Patch Panel?
Fiber patch panels are essential for high-density cabling systems. How to use them for deploying a network? In this section, the common steps for connecting patch panels with fiber optic cables or network switches will be demonstrated.
How to Connect Fiber Patch Panel with Fiber Cables?
It is critical to connect the cables correctly to the fiber patch panel so that the device can function properly. You can do it if you follow the steps.
Step 1: First, prepare a fiber patch panel and ensure that this work will be done on a clean and level work surface. If you choose the fully-loaded fiber patch panel, just install it on your rack with specific tools. If your patch panel is unloaded, please insert fiber adapter panels or cassettes into it. Then fix the mounting plate in the right position.
Step 2: Prepare cables according to standard termination procedures, and make sure there is plenty of extra cable to work with. Fix the cable to the gland and roll the excess fiber onto the spool. After that, remove the dust cap and insert it into the adapter. Once all of the cables are connected, use a zip tie to secure the cables in a bundle.
Step 3: To distinguish the cables, label each jack location on the fiber optic patch panel. Install the patch panel in a rack or cabinet.

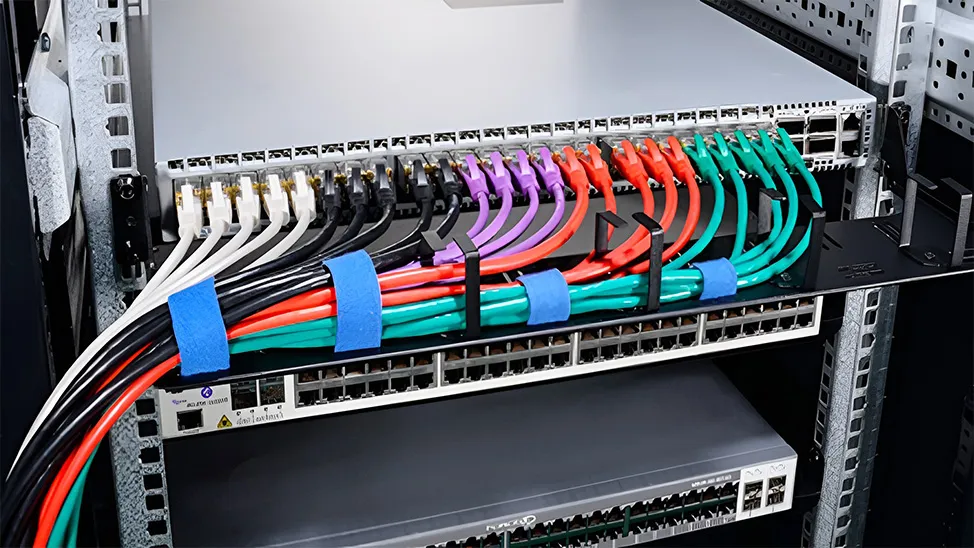
How to Install Ethernet Patch Panel and Network Switch?
Step 1: Attach the 24 port patch panel and 24 port switch to a rack-mounted floor stand in the wiring closet.
Step 2: Run the Ethernet cables from their jack locations out in the computer room. Each copper cable will come from a wall-mounted jack that the installer has placed in the wall. They will all return to the wiring closet through a small hole to accommodate the wires.
Step 3: Connect the wires to the 24-port patch panel and use a punch-down tool to connect the wires to the appropriate slots on the patch panel. Once the wires are all attached, it is better to secure the wires in a bundle by using plastic zip ties.
Step 4: Label each jack location on the 24 port patch panel to designate which room is connected to that jack.

How to Buy A Fiber Patch Panel?
In that we’ve known the usages of fiber patch panels, here comes another question – what should we consider while choosing the right optic patch panel? Here are those essential aspects:
Rack Size
In general, rack size is used U or RU as its unit. This unit describes the height of equipment designed to be mounted in a rack. In data centers, the most commonly used rack size is 1RU. Additionally, 2RU and 4RU are also used for high-density applications. In this section, you should choose the proper size depending on your preferred working place of the panels.
Port Density
Port density seems to be a main concern when choosing a fiber patch panel since high density is becoming one of the important trends in data centers. At present, a normal 1RU fiber patch panel can support up to 48 ports while a high-density patch panel can support up to 96 ports. For the MPO/MTP solution, there are ultra-density panels that can support up to 144 ports in 1RU size. In addition, fiber patch panels with 2RU or 4RU size can help achieve higher port density, meeting any of your port requirements.
Loaded or Unloaded
When choosing a fiber patch panel, you will meet another parameter, such as a loaded patch panel or an unloaded patch panel. The loaded patch panel means that the patch panel is loaded with fiber adapter panels, or fiber cassettes sometimes. In data center applications, the most widely used adapter panels are equipped with LC and MTP adapters. Contrary to the loaded fiber patch panel is the unloaded patch panel. For unloaded fiber patch panels, users should select fiber cassettes or adapter panels according to their fiber connector type or use a splice tray for single- and mass-fusing. The unloaded fiber patch panel is more flexible than the loaded one but may need an extra purchase for the accessories.
Compatibility
Before selecting the patch panel, confirm the polarity, performance, and connector type. Compatibility is doubtlessly an important consideration when selecting fiber patch panels. The compatibility of the panel with the embedded components would determine connectivity and performance. The technology used must be scalable to accommodate potential future changes. Such as you are going to upgrade your network from the existing 10G infrastructure to a high-speed 40/100G network, the MPO/MTP breakout patch panel solution may be an ideal choice for you. With LC adapter panels loaded in the front panel and MPO/MTP adapter(s) loaded in the rear panel, the MPO/MTP breakout patch panels offer a high-density, flexible architecture, and high-efficiency solution for your migration plan. In addition, MPO/MTP cassette is also a great way to save time and space for your upgrade plan.
The Advantages of Using a Fiber Patch Panel
1. Allows for the simple termination of fiber optic cables.
2. Connections of all input jacks/ports into a patch panel in a central location that are well-organized and simple to manage
3. Because all changes can be made at the patch panel, it makes it easier to connect different devices in different orders.
4. Because all connections are patched using the ports in the patch panels, there are no costs associated with wear and tear on the input ports of networking equipment.
Conclusion
Fiber cable installation and management is a tough thing to do, especially when there are hundreds or even thousands of cables. The fiber distribution panel offers great help in eliminating wire clutters, providing space, and protection for all the fiber cables needed by technicians in setting up fiber-optic links. It also makes cable management and troubleshooting work much easier. Its main function is to accommodate fiber cable terminations, connections, and patching. With fiber optic distribution panels, network technicians can control massive fiber cables and connection points in a standard panel or enclosure structure. Therefore, fiber optic patch panels make it simple and convenient for us to do cable management and maintenance.


Email Address


PoE vs PoE+ vs PoE++ Switch: How to Choose?
Mar 16, 2023


-