Cat6 Cable: All-round Interpretation and Its Applications
When cat6 cable was first introduced, it was approximately 50% more expensive than cat5e, making it cost-prohibitive for many installers. However, the costs of cat6 cabling have reduced substantially over the years to the point where the increased cost is relatively acceptable. Most importantly, providing greater bandwidth over cat5e and allowing for higher data transfer rates, cat6 cabling has now become a basic requirement for new installations to support Gigabit network applications and support bandwidths of up to 250MHz. This post will demystify Cat6 cable and its network applications.
The guide video below will demonstrate three common installations on how to terminate Cat6 cable including how to terminate into an RJ45 modular plug, into a toolless keystone jack, and a punch-down patch panel, taking FS Cat6 bulk cable as an example. I hope you find the instructions informative:
Cat6 Ethernet Cable Interpretation in General
1. What Is Cat6 Cable?
Cat6 cable, short for Category 6 cable, is a standardized cable used for Ethernet connections. It is an improved version of the earlier cat5 and cat5e cables, delivering higher data transfer speeds and better performance. With improved transmission capabilities, the cat6 ethernet cable is ideal for high-bandwidth applications, such as multimedia streaming, cloud computing, and video surveillance.

2. How Long Can Cat6 Cable Run?
A single run of Ethernet cable is designed to work at a maximum distance of 100 meters (328 ft). A length longer than that will result in issues such as dropped packets, reduced performance, and loss of signal when deploying the cat6 cable. The max length usually consists of 90 meters (295 ft) of solid "horizontal" cabling between the patch panel and the wall jack, plus 5 meters (16 ft) of stranded patch cable between each jack and the attached device. For 10GBASE-T, an unshielded cat6 cable should not exceed 55 meters.
3. Is Cat6 Cable Compatible With Cat5e Cable?
Cat5e vs Cat6 cables, both utilize the same end piece, i.e. they can plug into the same ports. The differences lie in their capabilities, as well as the methods and materials used to manufacture them. The "end" that all the cables have in common is RJ45, and it is capable of plugging into any Ethernet jack on a computer, router, PoE switch, or other devices.
4. What Are the Typical Applications of Cat6 Network Cables?
Cat5e vs Cat6 cables, both utilize the same end piece, i.e. they can plug into the same ports. The differences lie in their capabilities, as well as the methods and materials used to manufacture them. The "end" that all the cables have in common is RJ45, and it is capable of plugging into any Ethernet jack on a computer, router, PoE switch, or other devices.
Cat6 Cables for Various Scenarios in Home or Enterprise Network
Cat6 cables can be classified into different types according to different specifications: unshielded cat6 and shielded cat6 in terms of shielding types, and solid cat6 and stranded cat6 in terms of the copper conductor in pairs. With regards to cable jacket rating, there are CM, CMR, and CMP cat6. The choices of these ethernet cables vary from different application scenarios.
1. Unshielded vs. Shielded Cat6 Cable, How to Differentiate?
The unshielded cat6 cable, or UTP cat6, is a kind of cable with wires that are twisted together to reduce noise and crosstalk. Whereas the shielded cat6 is a twisted pair cable confined in a foil or mesh shield that guards the cable against electromagnetic interference (EMI), which is ideal for high-speed networks such as data centers where 10GBase-T networks are used-10GbE more sensitive to EMI. In a word, unshielded cat6 can be used between your computer and the wall, but shielded cat6 cables are more suitable in areas with high interference and running cables outdoors or inside walls. Further Reading: Shielded Cable vs. Unshielded Cat6a Cable

2. Solid vs Stranded Cat6 Cable, Which to Choose?
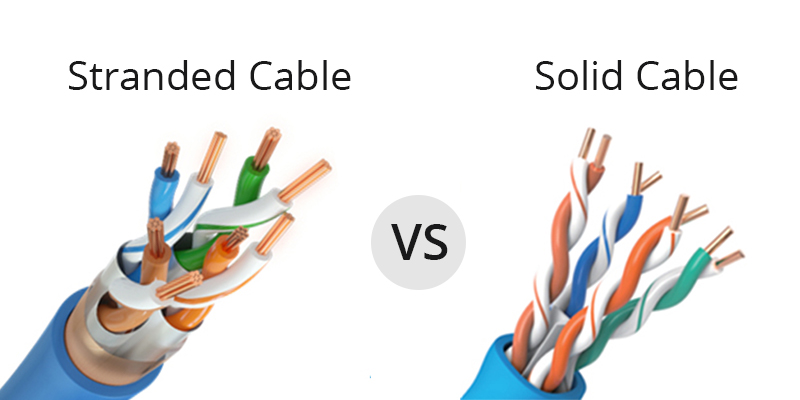
Solid cable uses a single piece of copper for the electrical conductor while stranded uses a series of copper cables twisted together. Therefore, stranded cable is more flexible and can be used at your desk or anywhere you may move the cable around often. Solid cable is not as flexible, but it is also more durable, which makes it ideal for permanent installations as well as outdoors and on walls.
Due to high attenuation, stranded cable runs should be kept short to lower the chance of introducing even more attenuation into the system. It's better to keep the lengths of stranded patch cables under 6 meters. It is common to use stranded patch cables for connecting workstation network interface cards (NICs) and outlets or between concentrators and patch panels, hubs, and other rack-mounted equipment. Solid vs Stranded Conductor Cable will further explain their differences.
3. CM vs CMR vs CMP Cat6 Cable, Where to Use?
Read CM vs CMR vs CMP first, if you have no clue about what they are.
-
Cat6 CM cables — generally the minimum jacket ratings of Ethernet cables and are appropriate for installation inside a residence or a single-story commercial building.
-
Cat6 CMR cable — "Riser-rated Cable". It's designed to prevent fires from spreading between floors through risers or vertical shafts.
-
Cat6 CMP cable — "Plenum-rated Cable". The jacket is made from a material that retards the spread of flames and does not give off much smoke or toxic gas when burned. Therefore, it's fit for plenum spaces where the building's air ducts are connected for heating, ventilation, and air conditioning, such as raised floors and drop ceilings. Most homes do not have significant plenum spaces, so plenum cabling is rarely a concern for residential installations.

DIY Your Cat6 Ethernet Cable: Cable Wiring Guide
Cat6 network cables sold online may not fit your needs, or they may need to be customized according to some specific application. How to make a cat6 patch cord? And how to terminate the cat6 cable? The instruction guide below is provided for creating your own cat6 patch cables. THREE BASIC STEPS: Strip - Arrange - Crimp!
-
Cut the length required: Pull the length required for your cable and cut the cable to the length needed. Tip: Add a little extra wire just in case.
-
Remove the outer jacket of the cable: Strip the cable about 1 inch from the end with the stripper tool and remove the cable stripper.
-
Untwist the wire pairs: Make them straight as much as possible.
-
Organize the wires: Depend on the wiring configurations T568A / T568B you are following.
-
Press the wires flat & parallel and cut the top of the wires: 1/2" (12.5 mm) long from the base of the jacket. Note: Leaving more than 1/2" untwisted can jeopardize connectivity and quality.
-
Insert the wires into the RJ45 plug: With the flat surface of the plug on top.
-
Place the wired plug into the crimping tool: Give the handle a firm squeeze.
-
Repeat: Follow the above steps with the other end of the cable.
-
Test: Ensure that the network cable will function in the field.

Related Articles:
You might be interested in
Email Address

-
PoE vs PoE+ vs PoE++ Switch: How to Choose?
May 30, 2024


